Smart Tags is one of the coolest features of OptinMonster which allows your campaigns and announcements to add dynamic text. To illustrate, with specially formatted placeholder text you can show a name for a visitor, or the given day of the week automatically. You can customize the text using Smart Tags when creating a campaign. You can have recourse from our Smart tags or you can specify your own custom Smart tags. Each Smart Tag must rely on two curly opening braces and end with two curly closing braces.
The above empowers us to evaluate the content to be replaced in less then your campaign. A predefined smart tag should have been the first value or the name of a custom variable you indicated.
Table of Contents
How to Add Smart Tag in OptinMonser
You can customize the text with smart tags when attempting to create a campaign. You can use our pre-specified smart tags or define your own personalized Smart Tags.
Take the following steps to contribute a Smart Tag:
Step 1: Throughout the campaign builder, add or edit a text dimension.

Step 2: To pick a pre – defined smart tag, select the { } curly braces key on the keyboard.
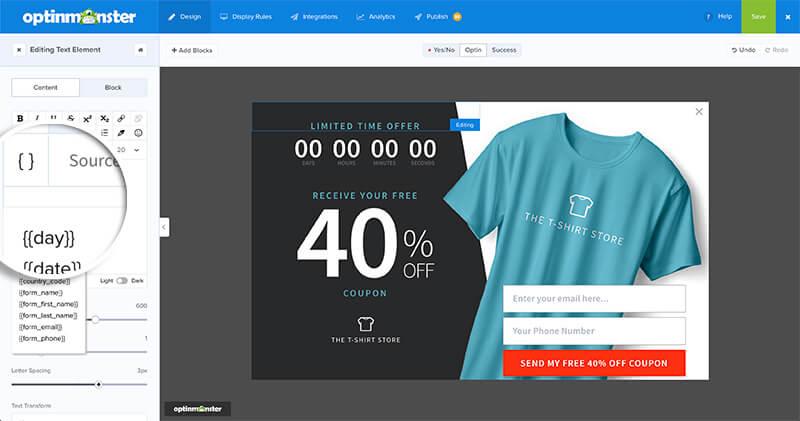
Step 3: Must choose Smart Tag you would like and it is decided to add to the text field editor automatically.
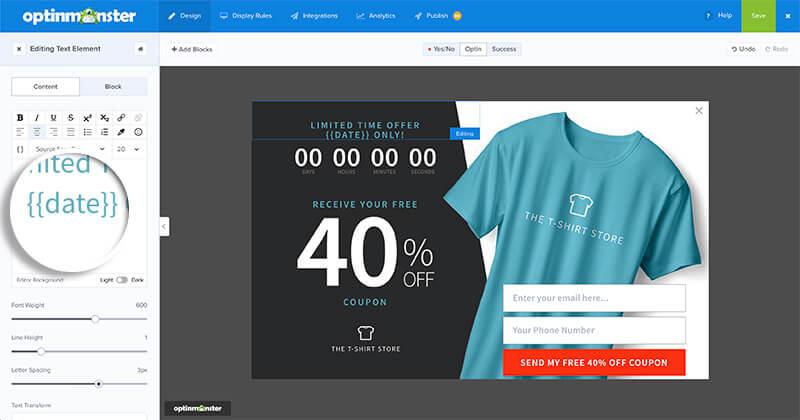
Step 4: That’s an opt-out step. In case the tag could perhaps find the information appropriate, define the default value to be used on the Smart Tag.

Step 5: Save changes once you’re accomplished.
Step 6: The Smart Tag is replaced by the dynamic value once it is public on either campaign.

Formats of Smart Tags in OptinMonster
{{SMART_TAG_NAME}}
Optionally, if the tag information cannot be located, you can use a pipe character (|) followed by text as the switch.
{{SMART_TAG_NAME|DEFAULT_TEXT}}
SMART TAG EXAMPLES IN OPTINMONSTER
This is a representation of a Smart Tag that displays the guest’s first name.
{{form_first_name}}
Using the Default Text
Throughout this illustration we are using the same smart tag but, if you cannot find tag data, we optionally specify ‘Visitor’ to use as the default text:
{{form_first_name|VISITOR}}
Predefined Smart Tags
The previous predefined smart tags can be used:
FORM DATA TAGS
- {{form_name}}:The complete name in the data field
- {{form_first_name}}:First ever name throughout the field of name {{form_last_name}}:The last name decided to enter in the field of name if a last name was entered
- {{form_email}}:The verified e-mail address
- {{form_phone}}: The contact information in the field
IMPORTANT: Forms may only be used when the form is presented and data from fields on the form may only be used. For instance, the name field must be enabled to use the name tag.
TIME AND DATE TAGS
- {{day}}: The revised day of the week
- {{month}}: The updated month
- {{year}}: The updated year
- {{date}}: The updated date
THE LOCATION TAGS
- {{city}}:Place of the guest
- {{state}}:The status of the guest, whether it is available
- {{region}}:The current guest region that comprises like states, provinces, etc.{{region_code}}:The abbreviation of the given region
- {{postal_code}}: The same as {{zip}}
- {{zip}}: The guest’s current zip code
- {{country}}: The guest’s updated country
- {{country_code}}: The updated country’s initialism (e.g. “UK” for “United Kingdom”)
TAGS FOR CUSTOMER COMMUTE
- {{page_url}}: The URL of the contemporary site page
- {{referrer_url}}: The URL of the former site page
- {{pages_visited}}: The number of pages the guest’s has clicked
- {{time_on_site}}: The time percentage the guest has spent on the site page in milliseconds
- {{visit_timestamp}}: The updated timeframe
- {{page_title}}: The title of the current page site
TAGS FOR CAMPAIGN NAMES
{{campaign_name}}: The name of the updated campaign
SMART TAGS FOR CUSTOM TAGS
Before getting into the topic you should know that for advanced users this content is currently. We officially do not support this function because of it’s custom evolution of custom Smart Tags.
You define custom Smart Tags and contain any specific data type you wish.
In order of priority, Smart Tags support three different custom data definition methods:
- Query Argument
- Cookie
- JavaScript Variable (advanced)
QUERY ARGUMENT
The step is to start with individualized smart tags by defining your specially made smart tags with the query arguments. You could add a query argument on your URL if you’d like to identify a custom tag named “name,” such as http://yourwebsite.com/?name=YourName
In the Web address above, the query argument is described by the fname key and the Your Name valuation. OptinMonster will scrutinize your URL. If a match is made, the quality of your query argument will be substituted for your Smart Tag.
Notice: There are some query argument terms secured for core functionality if your Website is built with WordPress. Don’t use a reserved query argument — see full list of WordPress Terms Reserved.
COOKIES
In addition, Smart Tags support cookie use. A cookies are small pieces of data sent through a website and saved in the user’s web browser. Like query arguments, OptinMonster will look for a fname cookie to substitute the Smart Tag by a cookie’s significance.
JAVASCRIPT VARIABLES
You can also use our full JavaScript API for our experienced users to be using personalized smart tags. Use the occasion om.Dtr.init to interactively sign up your own personalized Smart Tags. Available ‘event.detail.Campaign and event.detail.Dtr’ properties are including both the campaign and innovative text substitute instances. You can connect Smart Tags techniques using the Dtr image.
The ‘event.detail.Dtr.setCustomVariable’ system includes two variables at the most fundamental level: one key and one value. The key as well as the value must be strings at this time. You can insert as many specially made smart tags as you want. In these examples, the custom tag fname has also been added and the YourName value was offered.
Javascript API and Smart Tags
For Smart Tags, let’s take an actual example. You develop a marketing strategy to get people to register for your next webinar. Both customers and visitors can join us, but you’d like to put a little more special touch on your customers. In this particular instance, the first name of your clients will be referenced in your campaign, and visitors will be mentioned with the name “here already.”
In the OptinMonster Builder, the campaign will appear such as:

We have added the Smart Tag {{name|there}} to the campaign category, as you’ve seen. Now because the campaign is progressively dynamic, we identify our website with the following code to define the customized smart tag name:
document.addEventListener(‘om.Dtr.init’, function(event) {
console.log(event.detail.Dtr);
console.log(event.detail.Campaign);
// Registers a custom `name` smart tag.
event.detail.Dtr.setCustomVariable(‘name’, ‘YourName’);
} );
The text will suggest the customer’s name when the campaign loads also on site:

The tagging {{name|there}} has been changed by our customized tag value since the custom tag is defined with YourName.
The automatic text would instead be shown if the consumer’s name isn’t really accessible:

You can erase it from your customized Smart Tag if you do not need to use alternative text:

Also, OptinMonster will also not find an individually tagged name there unless you remove the custom smart tag description from the website. Throughout this case, OptinMonster merely replaces an empty space for the merge-tag. As quickly as the campaign loading on the page.

The smart tag was replaced with an empty space.
Smart Tags API Formats
Smart tags have had some public approaches with which you can access in your function definition.
setCustomVariable(key, value)
<script type=”text/javascript”>
document.addEventListener(‘om.Dtr.init’, function(event) {
/**
* API method for setting a custom variable. Must be accessed via the Dtr object.
* @param string $key The custom variable key to set.
* @param string $value The custom variable value to set for the key.
* @return null
*/
event.detail.Dtr.setCustomVariable(‘foo’, ‘bar’);
});
</script>
getCustomVariable(key)
<script type=”text/javascript”>
document.addEventListener(‘om.Dtr.init’, function(event) {
/**
* API method for retrieving a custom variable. Must be accessed via the app object.
* @param string $key The custom variable key to retrieve.
* @return string|bool The value of the custom variable key or false if not found.
*/
event.detail.Dtr.getCustomVariable(‘foo’);
});
</script>
hasCustomVariable(key)
<script type=”text/javascript”>
document.addEventListener(‘om.Dtr.init’, function(event) {
/**
* API method for checking if a custom variable has been registered.
* Must be accessed via the Dtr object.
* @param string $key The custom variable key to check.
* @return bool True if the custom variable exists, false otherwise.
*/
event.detail.Dtr.hasCustomVariable(‘foo’);
});
</script>
hasCustomVariables()
<script type=”text/javascript”>
document.addEventListener(‘om.Dtr.init’, function(event) {
/**
* API method for checking whether there are any custom variables set.
* Must be accessed via the Dtr object.
* @return bool True if any custom variable has been registered, false otherwise.
*/
event.detail.Dtr.hasCustomVariables();
});
</script>
deleteCustomVariable(key)
<script type=”text/javascript”>
document.addEventListener(‘om.Dtr.init’, function(event) {
/**
* API method for deleting a custom variable. Must be accessed via the Dtr object.
* @param string $key The custom variable to delete.
* @return null
*/
event.detail.Dtr.deleteCustomVariable(‘foo’);
});
</script>